Enhance the security of your cPanel webmail account by enabling Two-Factor Authentication (2FA). This feature adds an extra layer of protection, requiring both your password and a one-time code to access your account. Note that 2FA is supported only for CloudLinux 8 and above in cPanel version 13.
Step-by-Step Instructions to Enable 2FA
Step 1: Log In to Webmail
- Use your username and password to log in to your webmail account.
- Typically, you can access it by navigating to
https://yourdomain.com/webmail(replaceyourdomain.comwith your actual domain).
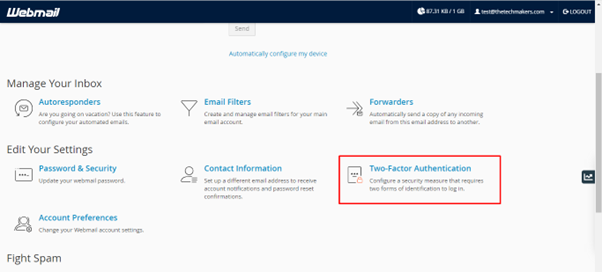
Step 2: Access the 2FA Option
- From the Webmail management screen, locate and click on the Two-Factor Authentication option (found at the bottom right corner of the page).
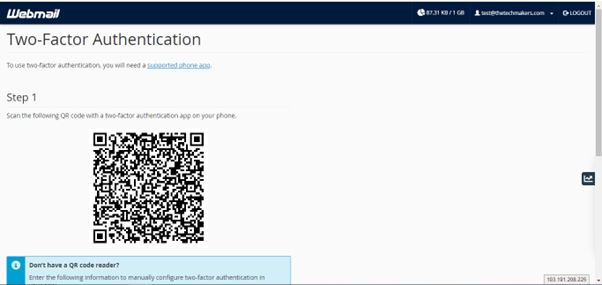
Step 3: Set Up 2FA with an Authenticator App
- A QR code will appear on your screen.
- Open an authenticator app like Google Authenticator or Duo Mobile on your smartphone.
- Follow the instructions to scan the QR code provided.
Step 4: Generate a Security Code
- After scanning the QR code, the authenticator app will generate a 6-digit code. This code changes every 30 seconds.

Step 5: Enter the Security Code
- Enter the 6-digit code in the Security Code text box.
- Click on Configure Two-Factor Authentication to proceed.
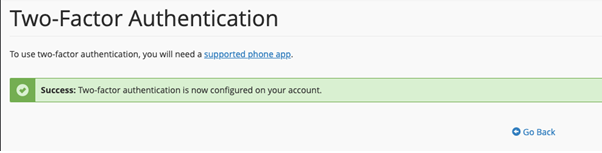
Step 6: Confirmation Message
- If the setup is successful, you’ll see a confirmation message indicating that 2FA has been enabled.
Step 7: Test the 2FA
- To verify, log in to your webmail again.
- Enter your username and password, followed by the 6-digit code generated by the authenticator app.
Wrapping It Up
By enabling Two-Factor Authentication (2FA) on your cPanel webmail, you’ve significantly enhanced the security of your emails and sensitive data. This additional layer of protection ensures that even if your password is compromised, unauthorized access is prevented.
Stay safe and enjoy the added peace of mind with 2FA!
